Crochet a Charming Lady Bunny: Amigurumi Rabbit Pattern With a Flower Dress
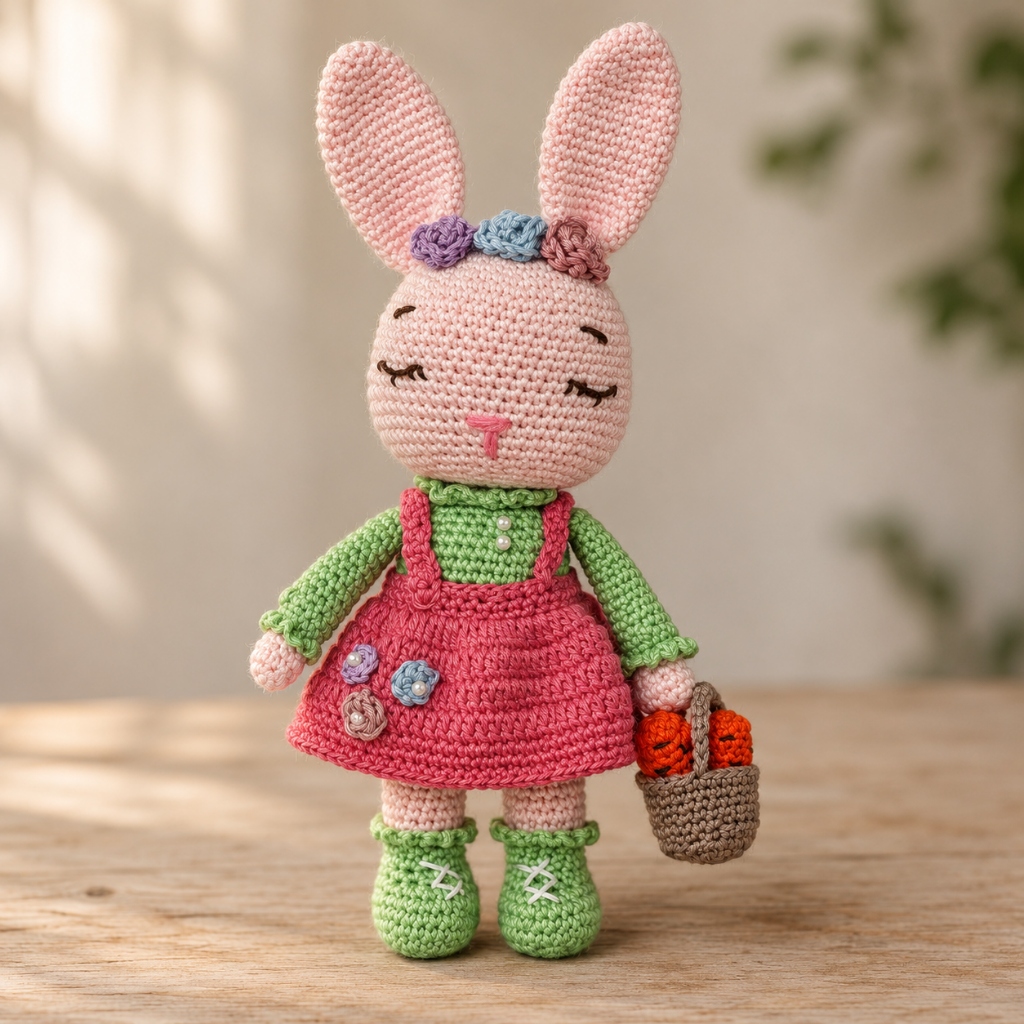
Meet Lady Bunny, a sweet crochet rabbit with tall pink ears, sleepy embroidered eyes, and a colorful handmade outfit. Her flower crown, pink dress, green boots, and tiny carrot basket give her a lovely personality.
This project brings together several small components, from the ears and arms to the dress and flowers. You will use crochet shaping, color changes, embroidery, and sewing as you bring your bunny together.
Settle into your favorite crafting spot, gather your supplies, and enjoy making each little detail. Keep the construction photographs nearby as visual references while you work.
Pattern Snapshot
| Skill Level | Not specified |
|---|---|
| Finished Size | Around 20 cm in circumference, about 10 cm in length |
| Hook Size | 2.5 mm, or a size that fits your yarn |
| Yarn Weight | Not specified |
| Terminology | US terms |
Materials and Supplies
- Yarn.
- Main color: soft pink.
- Color A: soft green.
- Color B: dark pink.
- Color C: smoked color.
- Color D: orange color (green color between the legs).
- 2.5 mm crochet hook, or a size that fits your yarn.
- Scissors.
- Stuffing.
- Tapestry needle.
- Stitch marker.
- Pins.
Stitch Abbreviations
- blo: back loop.
- ch: chain.
- cr: crochet.
- dc: double crochet.
- dc3tog: double crochet three together.
- dec: decrease.
- flo: front loop.
- hdc: half double crochet.
- FO / fo: fasten off.
- inc: increase.
- rnd(s): round(s).
- sc: single crochet.
- sc3tog: single crochet three together.
- slst: slip stitch.
- st: stitch.
- tr: treble stitch.
- (…): number in parentheses indicates the number of stitches at the end of the round.
- […]: repeat instructions the stated number of times or to the end of the round.
- (…): work the stitches all into the same stitch, where indicated by the instruction.
Step-by-Step Crochet Instructions
Legs and Torso
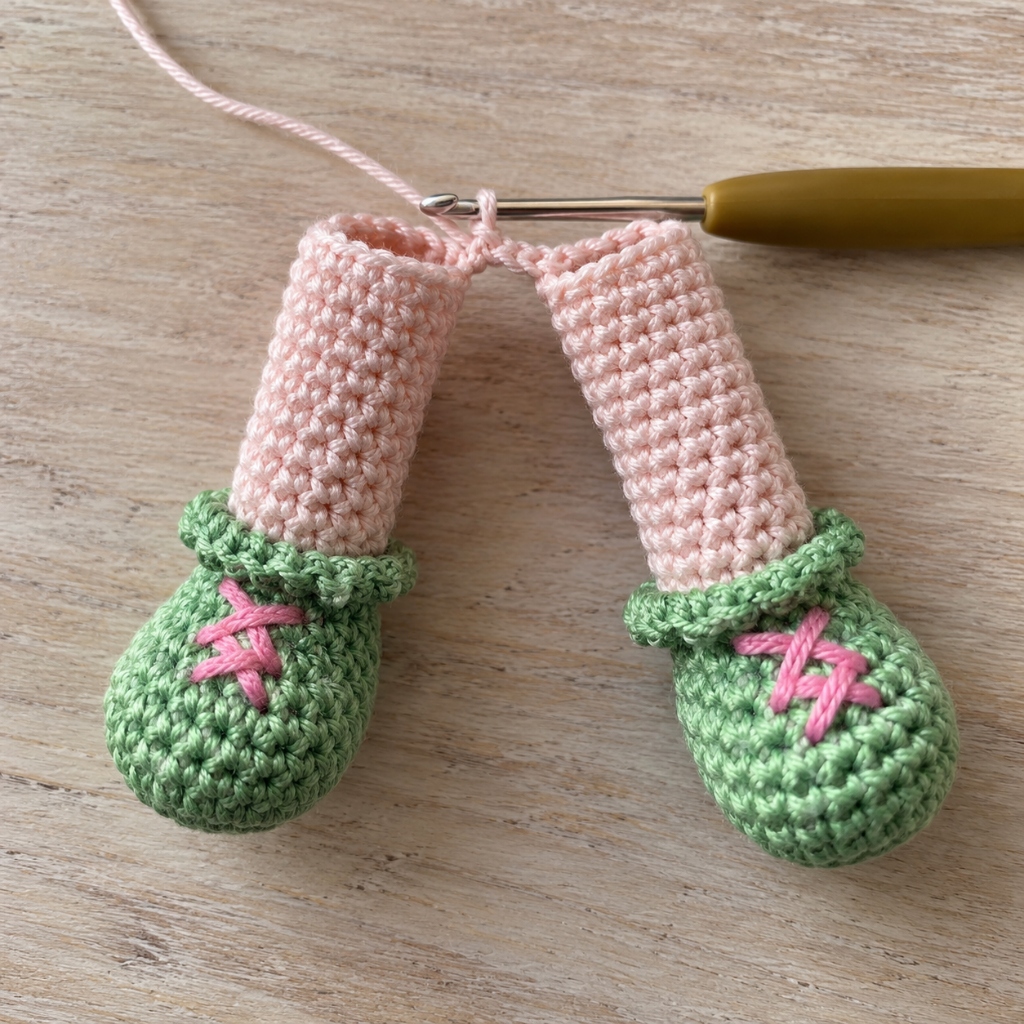
Round 1: 8 sc in a magic ring
Round 2: 8 sc inc(16 sc)
Round 3: 5 sc into sc(5 sc inc)6 sc into sc(21 sc)
Round 4-6: (3 ring)sc into sc(21 sc)
Round 7: 6 sc into sc(5 sc dec)6 sc into sc(16 sc)
Round 8: 6 sc into sc(2 sc dec)6 sc into sc(14 sc)
Round 9-11: (3 ring)sc into sc(14 sc) Ana color
Round 12: Only in flo sc into sc(14 sc)
Round 13-21: (9 ring)sc into sc(14 sc)
Round 22: Put the legs together, make 2 ch together.
sc into sc(30 sc)
Tightly stuff the legs. Keep filling as you go.
Round 23: 14 sc into sc(2 ch into 4 sc )14 sc into sc(32 sc)
Round 24-26: (3 ring)sc into sc(32 sc)
A COLOR
Round 27: (4 times)6 sc into sc next inc(36 sc)
Round 28-35: (8 ring)sc into sc (36 sc)
Round 36: (6 times)5 sc into sc next dec(30 sc)
Round 37: Sc into sc (30 sc)
Round 38: (6 times)5 sc into sc next dec(24 sc)
Round 39: Sc into sc(24 sc)
Round 40: Only in flo sc into sc(24 sc)
Round 41: Only in blo sc into 3 ch fo
Ears: Make 2
Main color
Round 1: 6 sc in a magic ring
Round 2: (3 times)1 sc into sc next inc(9 sc)
Round 3: (3 times)2 sc into sc next inc(12 sc)
Round 4: (2 times)5 sc into sc next inc(14 sc)
Round 5: (2 times)6 sc into sc next inc(16 sc)
Round 6: (2 times)7 sc into sc next inc(18 sc)
Round 7: (2 times)8 sc into sc next inc(20 sc)
Round 8-17: (10 ring)sc into sc(20 sc)
Round 18: (4 times)4 sc into sc next dec(16 sc)
Round 19: Sc into sc(16 sc)fo.
Leave a long thread end for sewing.
Arms: Make 2
Main color
Round 1: 5 ch.ch into sc(10 sc)
Round 2-5: (4 ring)sc into sc(10 sc)
Round 6: 5 sc into sc 2 ch. 2 ch into sc 5 sc into sc
Round 7: 2 ch out next 10 sc into sc
Round 8: (4 times)2 sc into sc next dec (6 sc)
Round 9: (4times)2 sc into sc next inc(10 sc)
Round 10: (4 times)3 sc into sc next inc(14 sc)
A COLOR
Round 11: Only in flo sc into sc(14 sc)
Round 12-22: (11 ring)sc into sc(14 sc)fo.
Straighten. Dip the crochet in both layers. (7 sc) fo.
Leave a long thread end for sewing.
Head
Main color
Round 1: 6 sc in a magic ring
Round 2: 6 sc inc(12 sc)
Round 3: 1 sc into sc next inc(18 sc)
Round 4: 2 sc into sc next inc(24 sc)
Round 5: 3 sc into sc next inc(30 sc)
Round 6: 4 sc into sc next inc(36 sc)
Round 7: 5 sc into sc next inc(42 sc)
Round 8: 6 sc into sc next inc(48 sc)
Round 9-14: (6 ring)sc into sc(48 sc)
Round 15: 11 sc into sc(3 sc inc)20 sc into sc(3 sc inc)11 sc into sc(54 sc)
Round 16: Sc into sc(54 sc)
Round 17: 13 sc into sc(3 sc inc)22 sc into sc(3 sc inc)13 sc into sc(60 sc)
Round 18-21: (4 ring)sc into sc(60 sc)
Round 22: 8 sc into sc next dec(54 sc)
Round 23: 7 sc into sc next dec(48 sc)
Round 24: 6 sc into sc next dec(42 sc)
Round 25: 5 sc into sc next dec (36 sc)
Round 26: 4 sc into sc next dec(30 sc)
Fill the head tightly.
Round 27: 3 sc into sc next dec(24 sc)
Round 28: 2 sc into sc next dec(18 sc)
Round 29: Sc into sc (18 sc)fo.
Leave a long thread end for sewing.
Rabbit’s Dress
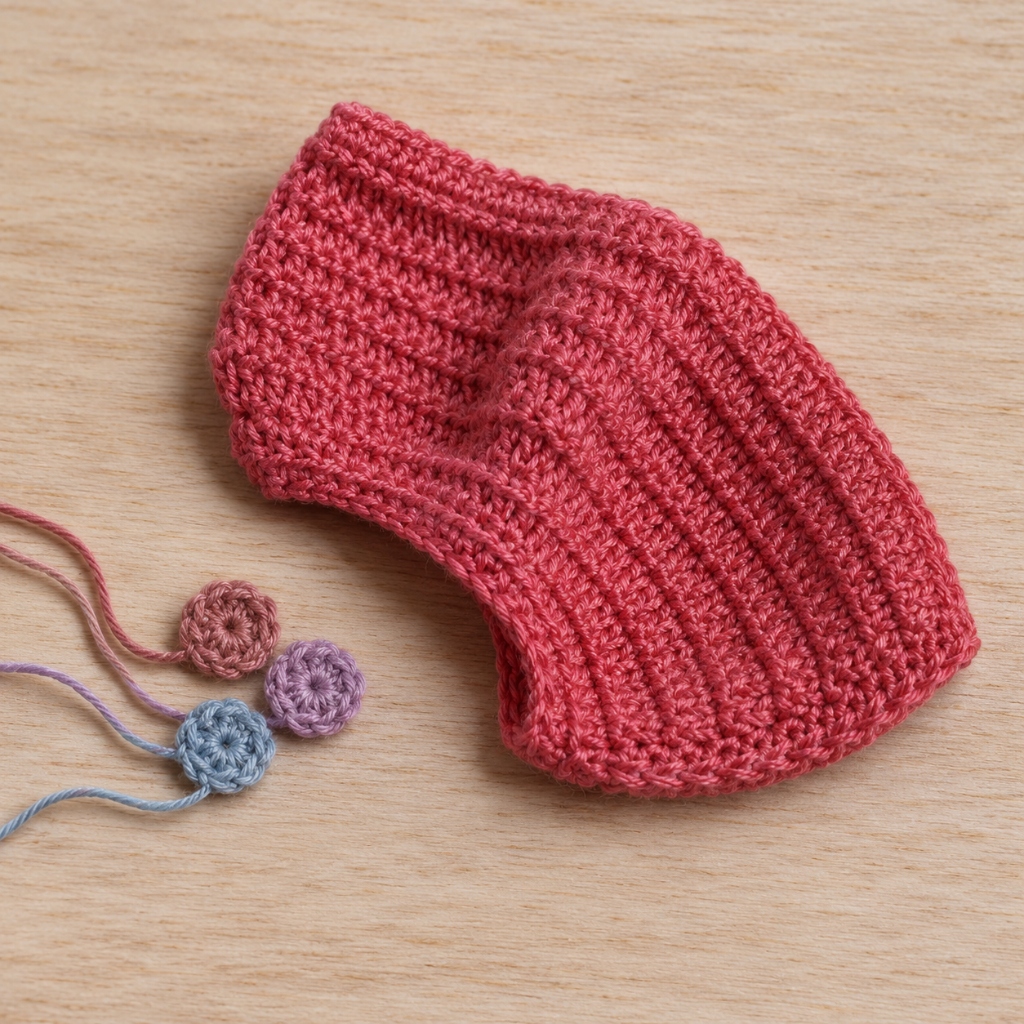
B COLOR
Round 1: 40 ch.
Round 2: 40 ch into sc(40 sc)
Round 3-4: (2 ring)sc into sc (40 sc)
Round 5: Sc into 2 ch(80 cr)
Round 6-8: (3 ring)cr into cr (80 cr)
Round 9-10: (2 ring)cr into sc(80 sc)
Round 11: Only in blo sc into sc(80 sc)fo.
Dress Straps: Make 2
30 ch.ch into sc (30 sc) fo.
Leave a long thread end for sewing.
Basket
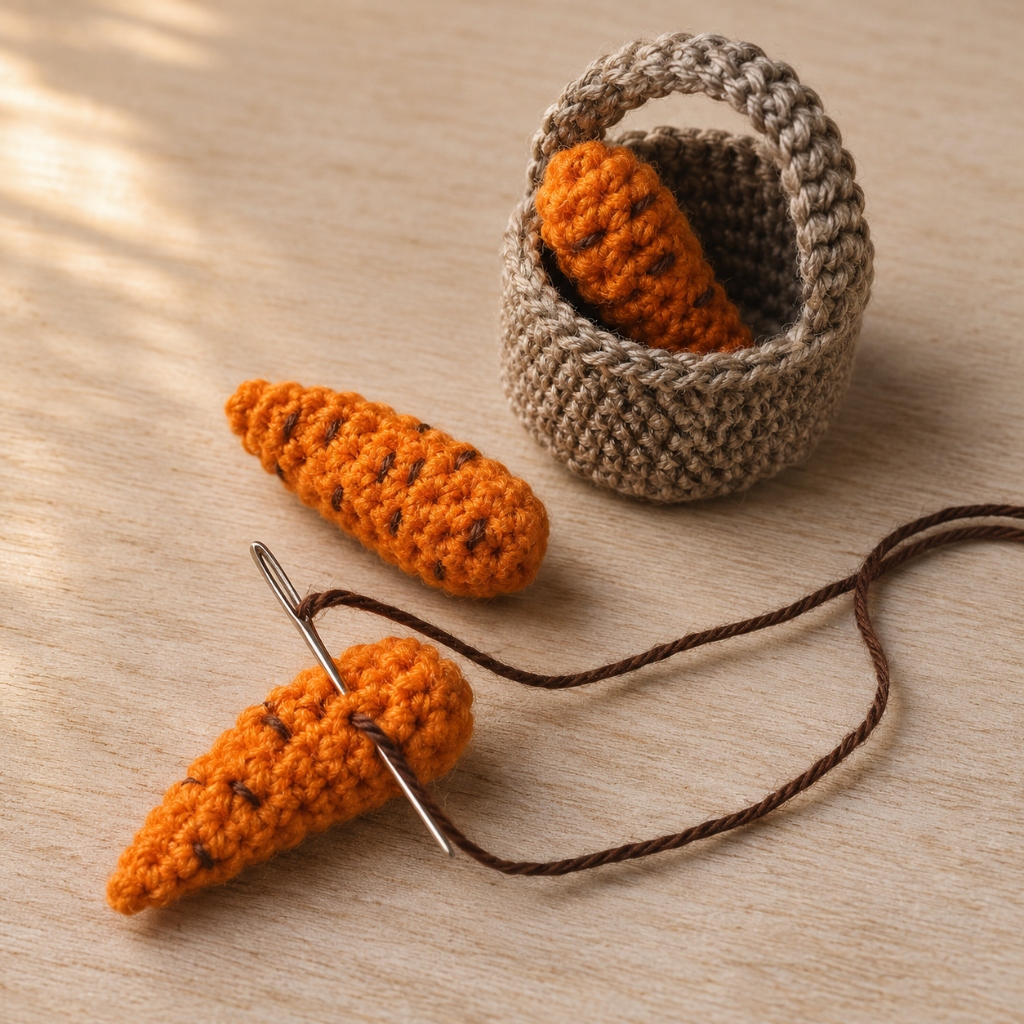
Round 1: 8 sc in a magic ring
Round 2: 8 sc inc(16 sc)
Round 3: 1 sc into sc next inc(24 sc)
Round 4: 2 sc into sc next inc(32 sc)
Round 5: Only in flo sc into sc(32 sc)
Round 6-11: (6 ring)sc into sc(32 sc)
Round 12: Basket hanger – 20 ch.
Round 13: 20 ch into 20 sc fo.
Carrot
D COLOR
Round 1: 8 sc in a magic ring
Round 2-8: (7 ring)sc into sc(8 sc)
Round 9: 1 sc dec(7 sc)
Round 10: 1 sc dec(6 sc)
Round 11: 1 sc dec(5 sc)
Round 12: 1 sc dec (4 sc)
Round 13: 1 sc dec(3 sc)fo.
Assembly and Finishing: Making of the Parts
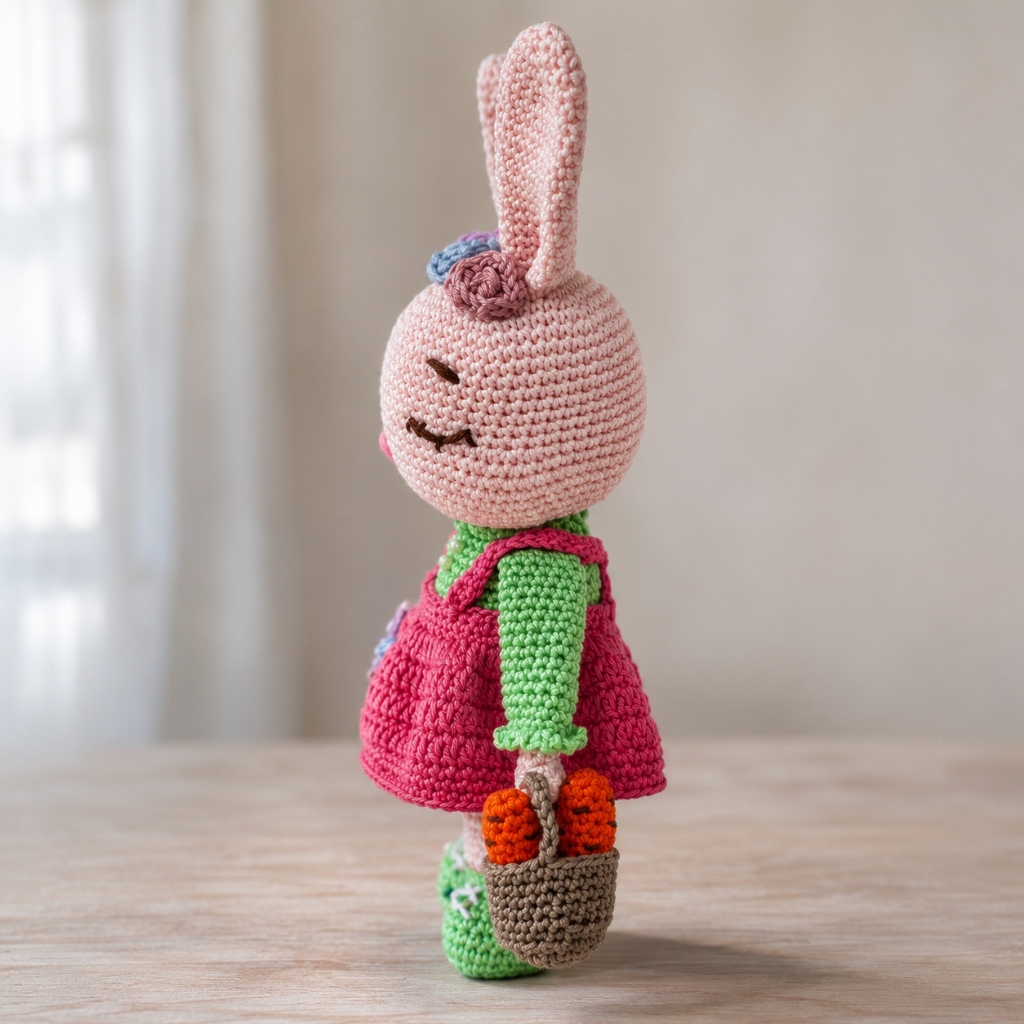
Use the assembly photographs below as visual references for the finished placement of the ears, facial embroidery, sleeves, dress straps, and basket.
The close-up views show the head and ears with the embroidery needle, while the side view shows how the clothing and basket sit on the finished bunny.
Flowers
Dress Flowers: Make 3
8 sc in a magic ring fo. Leave a long thread end for sewing.
Coronet Flowers: Make 3
10 ch. 1 ch into 3 cr 1 ch into 1 sc(15 cr 5 sc) Fo. Leave a long thread end for sewing.
Pro Maker Tips
Keep track of your rounds. Use a stitch marker and tick off each completed round so it is easy to return to your project after a break.
Keep color changes tidy. Leave accessible yarn ends at each transition and check the appearance before securing them.
Choose substitutions thoughtfully. Different yarn and hook combinations can change the size and texture of your bunny. Keep your yarn choices consistent across the project.
Final Thoughts
Lady Bunny is full of little details to enjoy, from her sleepy expression to her tiny carrot basket. Take a moment to appreciate every stitch and the care you have put into your handmade rabbit.
I would love to see your finished bunny. Share your make and tell me which detail you enjoyed creating most: the flowers, the outfit, or that adorable little basket. Happy crocheting!